Soziale Medien und WhatsApp: verbinden, posten und planen
Was Soziale Medien tut
Soziale Medien (Social Media) in der linken Seitenleiste hat drei Registerkarten. In Erstellen & planen (Create & Schedule) schreiben, planen und verwalten Sie Beiträge. Analyse-Dashboard (Analytics Dashboard) zeigt Ergebnisse. WhatsApp Business verbindet eine WhatsApp-Nummer und verwaltet Nachrichtenvorlagen. Sie können Konten bei LinkedIn, Facebook, X (als Twitter aufgeführt), Pinterest und Instagram verbinden. YouTube kann nicht verbunden werden. Es gibt keine Kalenderansicht: Geplante Beiträge stehen in einer Liste, der früheste zuerst.
Bevor Sie beginnen
- Wählen Sie in der Seitenleiste unter Aktuelles Konto (Current Account) eine Marketing-Beziehung aus. Konten und Beiträge gehören zu dieser Beziehung. Nur ein Firmenadmin kann bei einer Beziehung Marketing-Beziehung anhaken. Siehe Beziehungen: Ihr CRM für Unternehmen und Kontakte.
- Sie brauchen auf jeder Plattform ein Konto mit dem Recht, von dort aus zu posten. Für WhatsApp brauchen Sie ein Business-Konto bei Meta (Facebook).
Konten verbinden
- Öffnen Sie Soziale Medien und wählen Sie Konten verbinden. Nach der ersten Verbindung lautet die Schaltfläche n verbunden.
- Wählen Sie in Verbundene Konten verwalten unter Zum Verbinden verfügbar neben einer Plattform Verbinden.
- Melden Sie sich auf der Seite der Plattform an und erlauben Sie den Zugriff. Sie kehren zu Enydea zurück.
- Wählen Sie Fertig.
- Instagram nutzt dieselbe Anmeldung wie Facebook.
- Sie können mehr als ein Konto pro Plattform verbinden. Für LinkedIn wählen Sie Weiteres LinkedIn-Konto verbinden.
- Anmeldungen laufen von Zeit zu Zeit ab. Verbinden Sie das Konto neu, wenn Enydea Sie dazu auffordert. Ein LinkedIn-Konto, das eine neue Anmeldung braucht, zeigt Abgelaufen am mit einem Datum oder Kein gültiges Token und eine Schaltfläche Neu verbinden. Andere Konten zeigen Gültig bis mit einem Datum, sofern es bekannt ist.
- Verbinden Sie LinkedIn als dasselbe LinkedIn-Mitglied neu; ein anderes Mitglied erhält eine eigene Verbindung.
- Ein Facebook-Konto hat keine Schaltfläche Neu verbinden und zeigt Gültig bis auch nach diesem Datum weiter an. Schlagen seine Beiträge fehl, trennen Sie es und verbinden Sie es erneut.
- Das Symbol mit dem durchgestrichenen Link (Konto trennen) entfernt genau dieses eine Konto.
LinkedIn-Unternehmensseiten
- Wählen Sie neben einem funktionierenden LinkedIn-Konto das Gebäudesymbol (Unternehmensseiten, für die dieses Konto posten kann).
- Enydea fragt LinkedIn, welche Seiten Sie verwalten. Wählen Sie eine Seite, um sie hinzuzufügen.
- Wird keine Seite aufgeführt, geben Sie die Seiten-ID oder Admin-URL unter Seiten-ID oder Admin-URL ein, zum Beispiel
linkedin.com/company/12345/admin, und wählen Sie Seite hinzufügen.
Hinzugefügte Seiten erscheinen als Konten, wenn Sie einen Beitrag erstellen. Wählen Sie das x bei einer Seite, um nicht mehr als diese Seite zu posten.
Einen Beitrag erstellen und planen
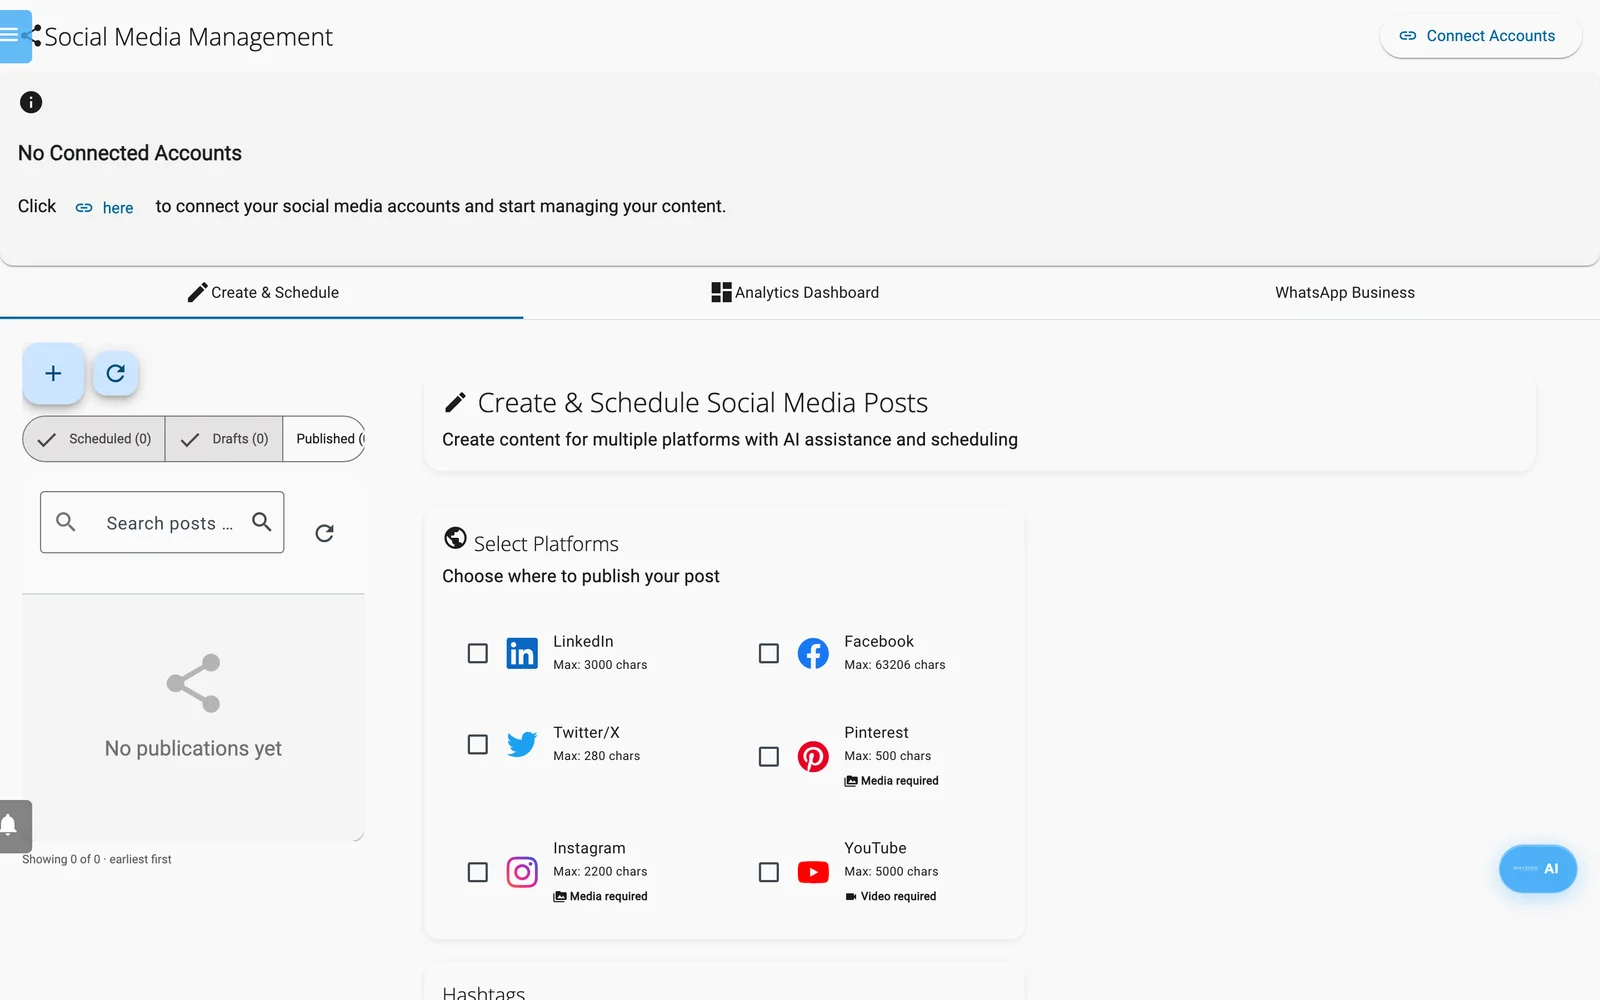
Erstellen & planen: Wählen Sie die Plattformen für einen Beitrag, dann schreiben und planen Sie ihn.
- Öffnen Sie die Registerkarte Erstellen & planen. Um einen neuen Beitrag zu beginnen, wählen Sie + (Neuer Beitrag) über der Liste links.
- Haken Sie unter Plattformen auswählen eine oder mehrere Plattformen an.
- Haken Sie unter Konten auswählen die Konten an, von denen aus gepostet wird. Eine Plattform mit nur einem Konto ist vorausgewählt.
- Unter Medien & Inhalt bieten Bild hinzufügen, Video hinzufügen und Alle Medien durchsuchen nur Enydeas eigene Symbole und Hintergrundbilder. Eigene Bilder oder Videos können Sie hier weder hochladen noch auswählen; siehe unten Mit dem KI-Assistenten posten.
- Schreiben Sie den Text in Beitragsinhalt, oder wählen Sie KI-Inhalt generieren, um einen Entwurf für die gewählten Plattformen zu erhalten. Vorhandener Text dient als Kontext. Bearbeiten Sie das Ergebnis.
- Optional: Wählen Sie KI-Hashtags oder einen vorgeschlagenen Hashtag, oder fügen Sie ein Emoji hinzu.
- Prüfen Sie die Vorschau rechts. Sie zeigt den Beitrag so, wie jedes Netzwerk ihn im Feed zeigt, mit Zeichenzähler, und aktualisiert sich während der Eingabe.
- Um sofort zu veröffentlichen, wählen Sie Jetzt posten. Der Beitrag wird in die Warteschlange gestellt und innerhalb einer Minute veröffentlicht.
- Um später zu veröffentlichen, haken Sie Für später planen an, legen Sie Geplantes Datum und Geplante Uhrzeit fest und wählen Sie Beitrag planen. Liegt der Zeitpunkt in der Vergangenheit, weist das Formular darauf hin, und die Schaltfläche bleibt deaktiviert. Beste Zeit festlegen trägt eine Uhrzeit nach einer festen Regel ein, zum Beispiel LinkedIn dienstags bis donnerstags um 09:00. Ihre Zielgruppe wird dabei nicht analysiert.
- Um einen Beitrag für später aufzubewahren, wählen Sie ein Konto und dann Entwurf speichern. Der Entwurf wird in Enydea gespeichert und erscheint unter Entwürfe, auch auf anderen Geräten. Es wird nichts veröffentlicht.
Grenzen der Plattformen
Wenn Sie mehrere Plattformen wählen, gilt für den Text das kürzeste Limit. Das Formular blockiert den Beitrag, bis die Regeln für Medien erfüllt sind. Ein Beitrag wird mit höchstens einem Bild oder einem Video veröffentlicht; weitere Bilder werden nicht gesendet.
| Plattform | Zeichen | Medien |
|---|---|---|
| 3.000 | Optional. Bis zu 9 Bilder und 1 Video | |
| 63.206 | Optional. Bis zu 10 Bilder und 1 Video | |
| Twitter/X | 280 | Optional. Bis zu 4 Bilder und 1 Video |
| 500 | Erforderlich. Höchstens 1 Bild und 1 Video | |
| 2.200 | Erforderlich. Bis zu 10 Bilder und 1 Video | |
| YouTube | 5.000 | Video erforderlich |
Bestehende Beiträge verwalten
Die Liste links enthält alle Beiträge der ausgewählten Beziehung, die frühesten zuerst, undatierte Entwürfe zuletzt.
- Die Schalter Geplant, Entwürfe und Veröffentlicht zeigen Anzahlen und legen fest, was aufgelistet wird; die ersten beiden sind beim Öffnen der Seite eingeschaltet. Ein Beitrag, den Enydea nicht senden konnte, zeigt Fehlgeschlagen unter Geplant.
- Beiträge nach Text, Konto oder Status durchsuchen... filtert die Liste. Aktualisieren lädt sie neu.
- Wählen Sie eine Zeile, um den Beitrag zu öffnen: „Entwurf wird bearbeitet“ oder „Sie bearbeiten einen geplanten Beitrag“. Ändern Sie ihn und wählen Sie dann Speichern & planen oder Jetzt veröffentlichen. Der gespeicherte Beitrag wird geändert, nicht kopiert. Schließen verlässt ihn ohne Speichern. Ist sein Konto nicht mehr verbunden, bittet Enydea Sie, ein anderes zu wählen.
- Ein veröffentlichter Beitrag öffnet sich schreibgeschützt. Wählen Sie In neuen Beitrag kopieren, um ihn wiederzuverwenden.
- Symbole in der Zeile: Jetzt veröffentlichen bittet um Bestätigung und stellt den Beitrag dann in die Warteschlange. In neuen Beitrag kopieren beginnt einen neuen Beitrag mit demselben Text, Konto und denselben Medien.
- Die Liste zeigt nicht, warum ein Beitrag Fehlgeschlagen ist. Enydea versucht es etwa 15 Minuten später erneut. Prüfen Sie das Konto in Verbundene Konten verwalten und nutzen Sie dann Jetzt veröffentlichen.
Mit dem KI-Assistenten posten
Der KI-Assistent sowie Claude oder ChatGPT über den Connector können Beiträge mit Ihrem eigenen Bild oder Video erstellen, wenn Sie die Adresse der Datei angeben (URL kopieren unter Dateien). Der Assistent erstellt einen Entwurf, oder einen geplanten Beitrag, wenn Sie ein zukünftiges Datum und eine Uhrzeit nennen. Er plant keinen zweiten Beitrag weniger als 6 Stunden vor oder nach einem anderen auf demselben Konto oder derselben Unternehmensseite, es sei denn, Sie bitten um beide. Seine Beiträge erscheinen in dieser Liste und können hier bearbeitet werden. Siehe Tutorial: Video mit dem KI-Assistenten auf LinkedIn posten.
- Ein Beitrag erscheint unter Ihrem Profil oder unter einer Unternehmensseite, die Sie hinzugefügt haben. Eine Verbindung, die eine neue Anmeldung braucht, wird unter Konten auswählen nicht angeboten.
- Enydea wartet bis zu 5 Minuten, bis LinkedIn ein Video verarbeitet hat, bevor es veröffentlicht. Videos über 200 MB werden nicht gesendet. Ein Beitrag mit einem Video und einem Bild wird mit dem Video veröffentlicht.
- Bilder, die nicht im Format JPEG, PNG oder GIF vorliegen, etwa WebP, werden in JPEG umgewandelt.
Gut zu wissen
Warnung: Die Liste Wiederkehrend und die Option Dynamischer Inhalt stehen im Formular, aber das Wiederholungsintervall und die Daten-URL werden nicht mit dem Beitrag gespeichert. Ein Beitrag wird einmal veröffentlicht. Um regelmäßig zu posten, planen Sie jeden Beitrag selbst.
- Konten auswählen listet Ihre LinkedIn-Profile und -Unternehmensseiten sowie Ihre Konten bei Facebook, Twitter/X und Pinterest. Instagram- und YouTube-Konten erscheinen dort nicht, daher veröffentlicht Enydea nicht auf Instagram oder YouTube.
- Pinterest braucht ein Board, um einen Pin zu erstellen. Weder das Formular noch der KI-Assistent können eines festlegen, daher schlagen Pinterest-Beiträge fehl.
- Können Medien bei X nicht angehängt werden, wird der Beitrag nur als Text gesendet.
- Text, den Sie eingeben, wird während des Schreibens in Ihrem Browser gespeichert (Entwurf gespeichert). Entwurf speichern speichert einen Beitrag in Enydea.
Analyse-Dashboard
- Wählen Sie einen Zeitraum: Letzte 7 Tage, Letzte 30 Tage, Letzte 3 Monate oder Letztes Jahr.
- Lesen Sie Follower gesamt, Avg Engagement, Beiträge gesamt, Impressionen gesamt und die Diagramme Engagement-Rate, Follower-Wachstum und Veröffentlichte Beiträge ab.
- Öffnen Sie unter Plattformdetails eine Plattform, um Follower, Engagement, Beiträge, Impressionen, Klicks und CTR zu sehen.
- Aktualisieren lädt neu, Exportieren lädt eine CSV-Datei herunter, und KI-Insights generieren schreibt Empfehlungen.
Die Zahlen sind das, was jede Plattform zuletzt gemeldet hat. Die Schaltflächen Auf … ansehen (mit dem Namen der Plattform) und Detaillierte Analysen tun nichts.
WhatsApp Business
Eine Nummer verbinden
- Öffnen Sie die Registerkarte WhatsApp Business, wählen Sie WhatsApp Business verbinden und dann Mit Meta verbinden.
- Melden Sie sich im Meta-Fenster bei Ihrem Meta- oder Facebook-Business-Konto an, wählen oder erstellen Sie ein WhatsApp-Business-Konto und fügen Sie eine Telefonnummer hinzu oder bestätigen Sie sie.
- Die Nummer erscheint unter Verbundene Telefonnummern.
Die Symbole neben einer Nummer ändern nichts bei Meta. Das Trennen-Symbol blendet die Nummer nur aus, bis Sie die Seite neu laden.
Vorlagen
WhatsApp stellt Personen, die Ihnen in den letzten 24 Stunden nicht geschrieben haben, nur genehmigte Vorlagen zu.
- Wählen Sie Vorlagenverwaltung und öffnen Sie dann Vorlage erstellen.
- Füllen Sie Vorlagenname (Kleinbuchstaben, Ziffern und Unterstriche), Sprache und Kategorie (Utility, Marketing oder Authentifizierung) aus.
- Wählen Sie optional einen Kopfzeilentyp. Schreiben Sie den Nachrichteninhalt (bis zu 1024 Zeichen, Variablen als
{{1}}) und optional einen Fußzeilentext. - Wählen Sie Zur Freigabe einreichen. Enydea sendet die Vorlage an Meta und meldet das Ergebnis: eingereicht, mit Metas Begründung abgelehnt oder gespeichert, aber nicht eingereicht.
Die Status sind Freigegeben, Ausstehend und Abgelehnt. Meta entscheidet später, wählen Sie also Von Meta aktualisieren, um sie neu einzulesen. Eine genehmigte Vorlage können Sie nicht löschen.
Chat-Bereich
Der Chat-Bereich listet die für die Beziehung gespeicherten WhatsApp-Unterhaltungen. Sie können eine Textnachricht oder eine genehmigte Vorlage senden. Text wird nur innerhalb des 24-Stunden-Fensters zugestellt. Medien zeigt „Medien-Upload ist bald verfügbar“. Der Bildschirm hat kein Formular, um einen Chat mit einer neuen Nummer zu beginnen, und keine Felder für Vorlagenvariablen, und die Liste WhatsApp-Nummer zeigt Konto-IDs.
Nachrichten, die Kunden an Ihre Nummer senden, kommen unter Chats an, sofern WhatsApp dort aktiviert ist. Nur Textnachrichten werden übernommen. Siehe Chat-Widget.