
LeadFinder: B2B-Unternehmen finden und qualifizieren
Was LeadFinder tut
LeadFinder findet Unternehmen, die bei Ihnen kaufen könnten, und übernimmt die passenden in Ihr CRM. Es arbeitet in drei Schritten, die oben im Bildschirm Leadfinder angezeigt werden: Recherche (Research) für die KI-Marktanalyse, Lead-Quellen (Lead Sources) für die Orte, an denen gesucht wird, und Unternehmen & Kontakte (Companies & Contacts) für das, was gefunden wurde.
Bevor Sie beginnen
- Füllen Sie Ihr Geschäftsprofil (Business Profile) aus: Einstellungen (Settings) -> Konto (Account), scrollen Sie zu Geschäftsprofil und klicken Sie dann auf Geschäftsprofil speichern. Die Marktanalyse und die Suche nach Quellen greifen darauf zurück. Der Einrichtungsassistent (Setup Wizard) kann es ausfüllen.
- LeadFinder speichert seine Suchen unter der Beziehung, die in der Seitenleiste unter Aktuelles Konto (Current Account) angezeigt wird. Ein neues Konto beginnt mit einer Beziehung, die nach Ihrem Unternehmen benannt ist.
- Marktanalyse, Quellensuche und Crawls laufen im Hintergrund und können Minuten dauern.
- Die Nutzungsgrenzen können von Ihrem Tarif abhängen; siehe Preise.
Schritt 1: Recherche
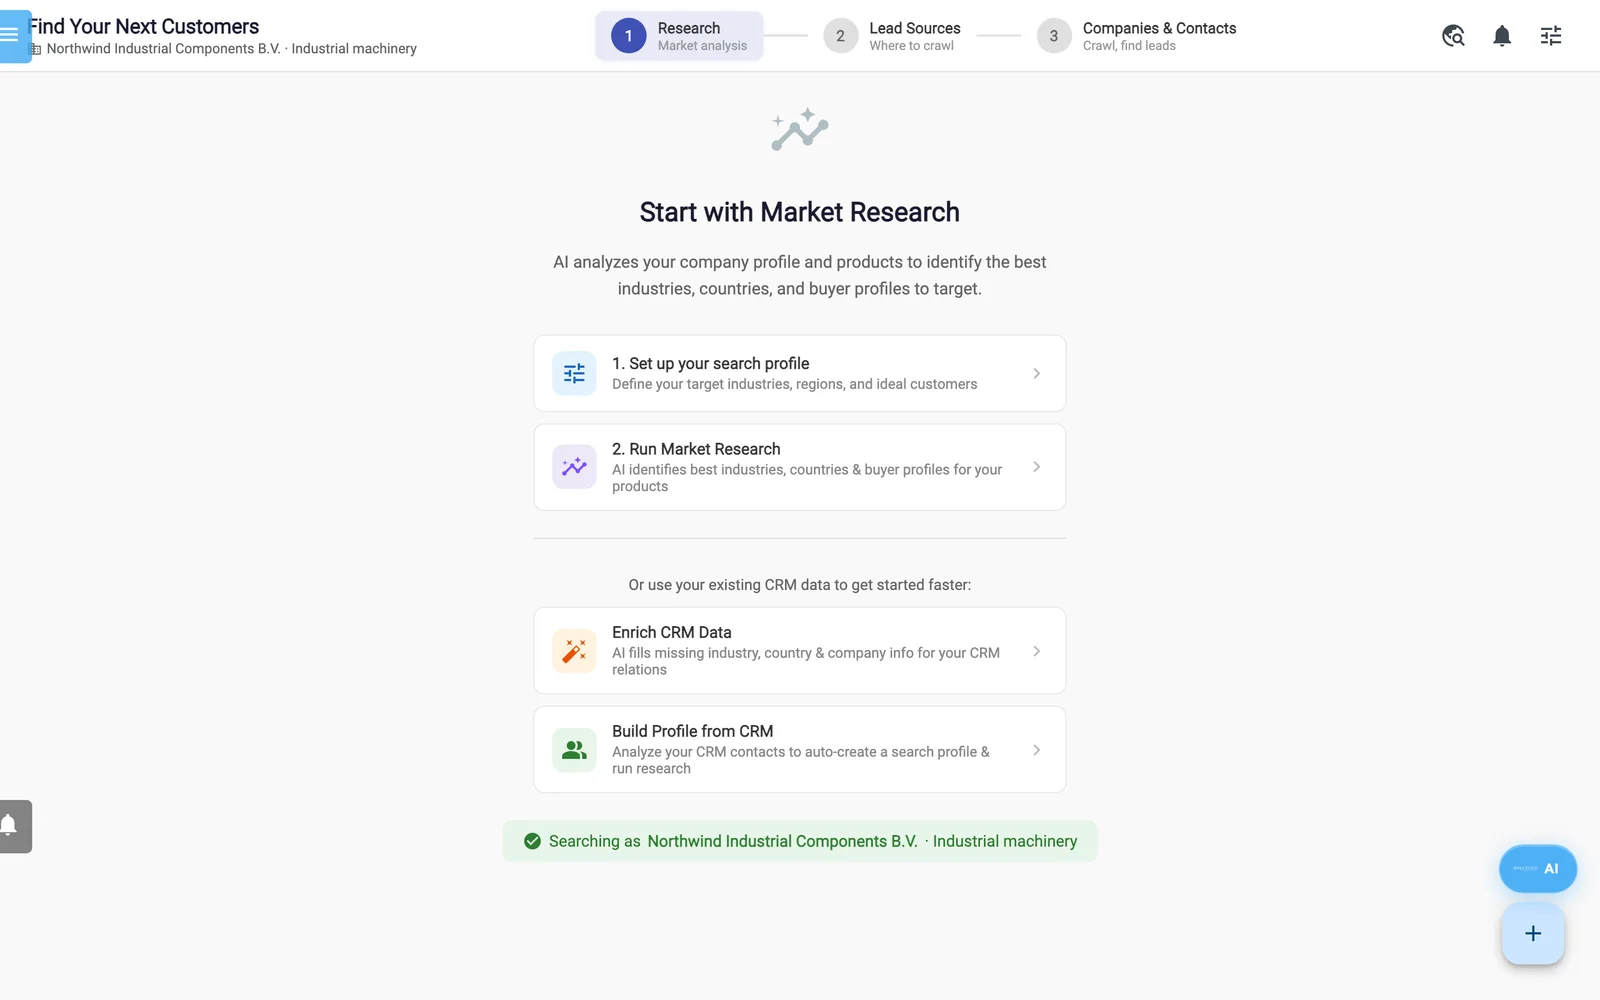
LeadFinder öffnet mit Recherche. Die drei Schritte oben sind Recherche, Lead-Quellen und Unternehmen & Kontakte.
Suchprofil einrichten
- Klicken Sie auf 1. Suchprofil einrichten. Später nutzen Sie dafür das Symbol mit den Schiebereglern oben rechts.
- Füllen Sie in Lead-Suchprofil die Felder Profilname, Branchen, Unternehmensgröße, Bevorzugte Funktion/Position des Kontakts, Land/Region, Unternehmenstyp, Schlüsselwörter, Jahresumsatz (min.), Jahresumsatz (max.), Technologie-Stack der Website und Weitere Hinweise aus.
- Optional: Klicken Sie auf Mit KI ausfüllen, um Werte für leere Felder vorschlagen zu lassen.
- Klicken Sie auf Speichern.
Marktanalyse durchführen
- Klicken Sie auf 2. Marktforschung durchführen (später Erneut ausführen).
- Prüfen Sie in Marktforschung konfigurieren die Felder Produkte, Dienstleistungen, Bekannte Wettbewerber, Beispielkunden, Zielmärkte/Regionen und Zusätzliche Ausrichtung / Hinweise.
- Klicken Sie auf Marktforschung starten. Laut Bildschirm dauert das 1-2 Minuten.
Die Ergebnisse der Marktforschung bewerten Top-Branchen und Top-Länder mit bis zu 100 Punkten und ergänzen Chancenmatrix, Product-Market-Fit, Wettbewerbserkenntnisse, Strategie & Maßnahmen und Kampagnensegmente. Bei Branchen und Ländern können unter Belege und Quellenbelege Webseiten aufgeführt sein; für die ersten fünf Länder gehört dazu eine Suche in der Geschäftssprache des jeweiligen Landes. Schaltflächen unter den Ergebnissen:
| Schaltfläche | Was sie tut |
|---|---|
| Lead-Quellen finden → | Findet Quellen anhand dieser Analyse und öffnet Schritt 2 |
| Ins Profil übernehmen | Überträgt die Ergebnisse in Ihr Unternehmensprofil und in das Lead-Suchprofil |
| Marktdaten anreichern | Ergänzt Marktgröße & Wachstumspotenzial |
| CRM anreichern | Ergänzt fehlende Angaben zu Branche, Land und Unternehmen in Ihren Beziehungen |
| Erneut ausführen, PDF, Löschen | Erneut ausführen, exportieren, löschen |
Eine Karte unter Kampagnensegmente hat die Schaltfläche Als Tag hinzufügen. Sie fügt dem Tag-Feld in Schritt 3 einen Tag wie „Branche | Land“ hinzu.
Schritt 2: Lead-Quellen
- Klicken Sie auf Lead-Quellen finden → oder in Schritt 2 auf Intelligente Suche (nutzt Ihr Unternehmensprofil) oder Quellen aus der Recherche finden.
- Gefundene Lead-Quellen listet Crawlbare Quellen (Messen, Verzeichnisse, Verbände, mit bis zu 100 Punkten bewertet) und Suchstrategien (Links zu Suchen in Google oder LinkedIn).
- Klicken Sie bei einer Quelle auf Crawlen. Das Fenster Neue Lead-Suche erstellen öffnet sich mit dieser Website. Klicken Sie auf Suche ausführen.
- Oder klicken Sie auf Alle Quellen crawlen (n), um alle Quellen in einer einzigen Hintergrundaufgabe zu durchsuchen. Schritt 3 öffnet sich, wenn sie fertig ist.
- Mehr entdecken und Mehr aus der Recherche finden fügen Quellen hinzu. URL manuell crawlen öffnet das Crawl-Fenster mit leerer Adresse.
Das Globussymbol in der Symbolleiste (oder Alle URLs) öffnet Gefundene URLs. Geben Sie eine Adresse ein, legen Sie Max. Tiefe (1 bis 3) und Max. URLs (50 bis 500) fest und klicken Sie auf Entdecken. Jede Seite erhält eine Kategorie, einen Lead-Score und einen Status. Nach Leads crawlen durchsucht diese Seite. Zum Crawlen einreihen und Überspringen ändern nur die Statusbezeichnung.
Schritt 3: Unternehmen & Kontakte
Letzte Suchen listet jeden Crawl; klicken Sie auf einen, um seine Unternehmen zu sehen. Gespeicherte Suchen sind wiederverwendbare Website-Suchen, die Sie bearbeiten, ausführen (Play-Symbol) oder löschen können. Jede Website-Suche, die Sie ausführen, wird außerdem automatisch gespeichert, benannt mit „Suche“ plus Datum und Uhrzeit.
Jede Unternehmenskarte zeigt Standort, Lead-Score, Website, E-Mail und Kontakte. Klicken Sie auf eine Karte, um ihre schreibgeschützten Unternehmensdetails zu öffnen; dabei wird sie zugleich an- oder abgehakt. Symbole auf der Karte analysieren die Website auf Lead-Indikatoren (Messen, Verbände, Partnerschaften, Zertifizierungen) oder suchen Kontakte. Grenzen Sie die Liste mit Unternehmen filtern (nach Name oder Beschreibung) und den Schaltern Mit Kontaktpersonen, Mit Website und Mit E-Mail ein.
Unternehmen in Ihr CRM übernehmen
Hinweis: Jede Suche, auch Crawlen und Alle Quellen crawlen, speichert jedes gefundene Unternehmen mit eigener Website bereits als Beziehung, ohne Tags und ohne Status. Eine Beziehung, die bereits genau diese Website hat, wird mit dem gecrawlten Namen, der Adresse, dem Land, der Telefonnummer, der E-Mail-Adresse und LinkedIn überschrieben, soweit der Crawl sie gefunden hat. Auswahl zu Beziehungen hinzufügen fügt dann die Ansprechpartner dieser Unternehmen hinzu, aber nicht Ihre Tags, und Auf Duplikate prüfen markiert sie.
- Optional: Klicken Sie auf E-Mails anreichern.
- Optional: Klicken Sie auf Auf Duplikate prüfen und dann auf Duplikate abwählen. Bei einer neuen Suche hakt das auch die Unternehmen ab, die die Suche selbst gespeichert hat, sodass deren Ansprechpartner nicht hinzugefügt werden.
- Geben Sie in Tags für gespeicherte Beziehungen einen Tag ein und drücken Sie Enter, oder klicken Sie auf einen vorgeschlagenen „+ Tag“.
- Haken Sie die Unternehmen an oder klicken Sie auf Alle auswählen.
- Klicken Sie auf Auswahl zu Beziehungen hinzufügen.
| Schaltfläche | Was sie tut |
|---|---|
| Auswahl zu Beziehungen hinzufügen | Speichert die angehakten Unternehmen und ihre Kontakte als Beziehungen. Ein Unternehmen, das nach Name, Website oder E-Mail zu einer bestehenden Beziehung passt, wird nicht doppelt angelegt: Neue Kontakte kommen zur bestehenden Beziehung, und ein Unternehmen mit anderer Adresse, anderem Ort oder anderem Land wird ihre Tochtergesellschaft. Tags gelten für neue Beziehungen und Tochtergesellschaften. |
| E-Mails anreichern | Tooltip: „Fehlende E-Mail-Adressen mit einer kostenoptimierten Strategie finden“. Erfasst jedes Unternehmen der geöffneten Suche: Kontakte mit Namen, aber ohne E-Mail-Adresse, bei Unternehmen mit Website. Eine Meldung nennt die gefundenen Adressen, die Kosten und die Methode (Extrahiert, Gelernt, Gängig, Hunter). Beim Speichern werden keine Adressen ergänzt, führen Sie dies also zuerst aus. |
| Auf Duplikate prüfen | Markiert Bereits im CRM (Duplikat). Der Abgleich ist großzügig, prüfen Sie markierte Karten also selbst. |
| Kontakte für Auswahl finden | Wählen Sie Funktionen aus, dann Kontaktsuche starten. Fügt jedes angehakte Unternehmen ohne Dublettenprüfung zu Beziehungen hinzu und startet eine Suche im Hintergrund. |
| Intelligente Kontaktsuche | Fügt angehakte Unternehmen zu Beziehungen hinzu (ohne Tags), sucht per KI nach Entscheidungsträgern und meldet eine Anzahl. |
Hinweis: Für Ansprechpartner nutzen Sie Kontaktpersonen extrahieren bei einer Website-Suche und dann Auswahl zu Beziehungen hinzufügen. Kontakte für Auswahl finden speichert ausstehende Vorschläge, und die App hat keinen Bildschirm, um sie zu bestätigen. Intelligente Kontaktsuche speichert die gefundenen Personen nicht.
Neue Suchen erstellen
Die Schaltfläche + unten rechts öffnet Neue Lead-Suche erstellen.
- Text-/Website-Suche (Text / Website Search): Beschreiben Sie Ihren idealen Kunden und klicken Sie auf Suche. Die KI schlägt Branchen, Länder, Größen, Beispielunternehmen und Quellen vor. Entfernen Sie, was nicht passt, und klicken Sie dann auf Suche starten.
- Bestimmte Website durchsuchen: Setzen Sie dieses Häkchen, um eine einzelne Website zu crawlen. Geben Sie Website und Max. Seiten ein. Optional: Anmeldung erforderlich, KI-gestützte Filter, Kontaktpersonen extrahieren (nur bei Website-Suchen). Klicken Sie auf Suche ausführen oder auf Vorlage speichern, um die Suche zu speichern, ohne sie auszuführen. Anmeldedaten werden mit der gespeicherten Suche abgelegt.
- Aus Katalog (From Catalog): Wählen Sie einen Katalogartikel, klicken Sie auf Kunden finden und dann auf Suche starten.
Weitere Aufgaben über den KI-Assistenten
Für manche LeadFinder-Arbeiten gibt es keine Schaltfläche. Fragen Sie den KI-Assistenten (AI Assistant) im Modus AGENT oder Claude bzw. ChatGPT über den Connector. Abgesehen vom Verzeichnis-Crawl erscheinen diese Aufgaben nicht in der Leiste LeadFinder-Aufgaben; fragen Sie den Assistenten nach ihrem Status.
| Bitten Sie den Assistenten, … | Was passiert |
|---|---|
| die Ausstellerliste einer Messe zu durchsuchen (mit ihrer Adresse und dem Namen der Messe) | Eine Hintergrundaufgabe in einem echten Browser, die die Ausstellerprofile selbst findet. Sie kann bis zu einer Stunde dauern und nutzt Anmeldedaten, die Sie mit Anmeldung erforderlich für diese Website gespeichert haben. Die Aussteller warten als Interessenten, bis Sie den Assistenten bitten, sie zu übernehmen. Jeder wird dann eine Beziehung mit dem Status Lead, dem Messenamen in Quelle (Source) und als Tag, Kategorie-Tags cat: und seinen aufgeführten Kontakten. Bei einer bestehenden Beziehung (gleiche Website, sonst gleicher Name) werden nur leere Felder ausgefüllt und die Tags ergänzt. |
| eine Verzeichnisseite zu durchsuchen | Speichert die gefundenen Unternehmen direkt in Beziehungen, auch solche ohne Website. Die Suche wird unter einer Beziehung namens „Leadfinder Source (AI Agent)“ abgelegt, nicht unter Letzte Suchen. |
| für eine Beziehung Entscheidungsträger im Web zu finden (nennen Sie die Rollen) | Speichert Personen aus öffentlichen Profilen als Ansprechpartner, mit der Rolle in Funktion/Position (Function/Position). Eine E-Mail-Adresse, die nicht veröffentlicht gefunden wird, wird aus dem Adressschema des Unternehmens gebildet und ist eine Vermutung; ohne Website gibt es keine. |
| für eine Beziehung E-Mail-Adressen mit Hunter.io zu finden | Speichert die für die Domain der Beziehung gefundenen Personen als Ansprechpartner. Postfächer für Recruiting, No-Reply, Presse und Datenschutz, private sowie allgemeine Postfächer wie info@ werden übersprungen. |
| Entscheidungsträger für viele Beziehungen zu finden (nach Tag oder Land) | Eine Hintergrundaufgabe über Beziehungen mit Website und noch ohne Kontakt: die Website des Unternehmens, Hunter.io (Rollen in Geschäftsführung und Einkauf) und eine Websuche nach den Rollen, die Sie nennen. Die Websuche behält nur Titel aus Einkauf, Werk, Produktion, Betrieb, Engineering, Instandhaltung, Projekten, Qualität, F&E und Labor, es sei denn, Sie bitten darum, diesen Filter auszuschalten. |
| fehlende Funktionsbezeichnungen zu ergänzen | Füllt Funktion/Position bei Ansprechpartnern mit Vor- und Nachnamen, aber ohne Titel, indem die Person zusammen mit dem Firmennamen gesucht wird. |
Für Kaufsignale wie neue Werke oder verzögerte Projekte in Nachrichten und Börsenmitteilungen siehe Marktsignale.
Aufgaben und Benachrichtigungen
Die Leiste LeadFinder-Aufgaben zeigt für jede Hintergrundaufgabe den Status (In der Warteschlange, Läuft, Abgeschlossen, Fehlgeschlagen), den Fortschritt und die letzte Meldung. Eine fehlgeschlagene Aufgabe starten Sie mit ihrem Aktualisieren-Symbol erneut.
Die Glocke in der Symbolleiste öffnet Benachrichtigungen. Sie schalten die Benachrichtigungen unter Einstellungen -> Konto -> Benachrichtigungseinstellungen -> Leadfinder-Benachrichtigungen ein oder aus. Nach einer Marktanalyse bereitet die Schaltfläche Google Ads in der Symbolleiste einen Kampagnenvorschlag vor; siehe Google Ads und Werbung.