
Formulare: erstellen, einbetten und Anfragen prüfen
Was der Bereich Formulare tut
Der Bereich Formulare (Forms) ist ein Drag-and-drop-Baukasten für Kontakt- und Anfrageformulare. Sie fügen einen Code-Schnipsel in Ihre Website ein, und jede Einsendung kommt in Enydea als Formulareintrag an, den Ihr Team ins CRM übernehmen oder per E-Mail beantworten kann. Eine Landingpage kann dasselbe Formular zeigen (Landingpages).
Bevor Sie beginnen
- Wählen Sie in der Seitenleiste unter Aktuelles Konto (Current Account) eine Beziehung aus. Formulare werden unter dieser Beziehung gespeichert. In dieser Liste erscheinen nur Marketing-Beziehungen (Beziehungen und CRM).
- Um ein Formular auf Ihrer Website anzuzeigen, müssen Sie oder Ihr Webentwickler den HTML-Code der Seite bearbeiten.
- Um aus Enydea heraus zu antworten, verbinden Sie ein Postfach (Einstellungen -> E-Mail-Integration). Ohne Postfach öffnet Per E-Mail antworten Ihr E-Mail-Programm.
Ein Formular erstellen
- Klicken Sie in der Seitenleiste auf Formulare (Forms).
- Klicken Sie auf die Schaltfläche + (Neues Formular erstellen). Ein Formular namens „Neues Formular“ öffnet sich auf der Registerkarte Formular bearbeiten (Edit form).
- Oder lassen Sie stattdessen die KI einen Entwurf erstellen: Klicken Sie auf die Schaltfläche mit dem Funkelsymbol (Formular mit KI generieren), beschreiben Sie das Formular unter Beschreiben Sie das gewünschte Formular und klicken Sie auf Generieren.
Die KI erstellt immer ein neues Formular, sodass nichts überschrieben wird, was Sie gebaut haben. Sie fügt eine Schaltfläche Send hinzu. Prüfen Sie das Ergebnis; die KI-Erzeugung zählt als KI-Nutzung. Um ein Formular zu kopieren oder zu löschen, verwenden Sie das Dreipunktmenü unter Formular-Einstellungen.
Das Formular einrichten
Öffnen Sie auf der Registerkarte Formular bearbeiten den Bereich Formular-Einstellungen (Form settings).
- Farbe des Formularfelds, Textfarbe, Hervorhebungsfarbe, Vorschlagsfarbe, Schriftart auswählen und die Schriftgröße gestalten das Formular.
- Dankesnachricht und Dankesbild erscheinen, nachdem jemand das Formular gesendet hat. Schreiben Sie Ihren eigenen Text.
- Einsendungen automatisch zum CRM hinzufügen macht aus jeder Einsendung eine Beziehung mit einem Ansprechpartner. Bestehende Kontakte werden anhand der E-Mail-Adresse erkannt, sodass nichts doppelt angelegt wird. Eine Einsendung braucht eine E-Mail-Adresse oder einen Namen oder ein Unternehmen.
- Aktion nach dem Senden auswählen bietet Kontaktformular speichern, als E-Mail senden, als Kontakt speichern und als Nachricht speichern. Enydea speichert Ihre Wahl, aber jede Einsendung wird gleich behandelt: Sie wird als Formulareintrag gespeichert, und Ihr Team wird benachrichtigt.
Geben Sie über der Vorschau unter Name des Formulars einen Namen ein und klicken Sie am Ende auf Formular speichern (das Diskettensymbol).
Elemente hinzufügen
Ziehen Sie Elemente aus Werkzeuge in das Formular: auf HIER ABLEGEN für eine neue Zeile oder in eine bestehende Zeile, um Elemente nebeneinander zu platzieren. Klicken Sie auf ein Element, um es unter Element anpassen zu ändern. Symbole neben einem Element löschen oder kopieren es (Element kopieren, als neue Zeile unten angefügt); mit den Pfeilen an einer Zeile verschieben oder löschen Sie Zeilen.
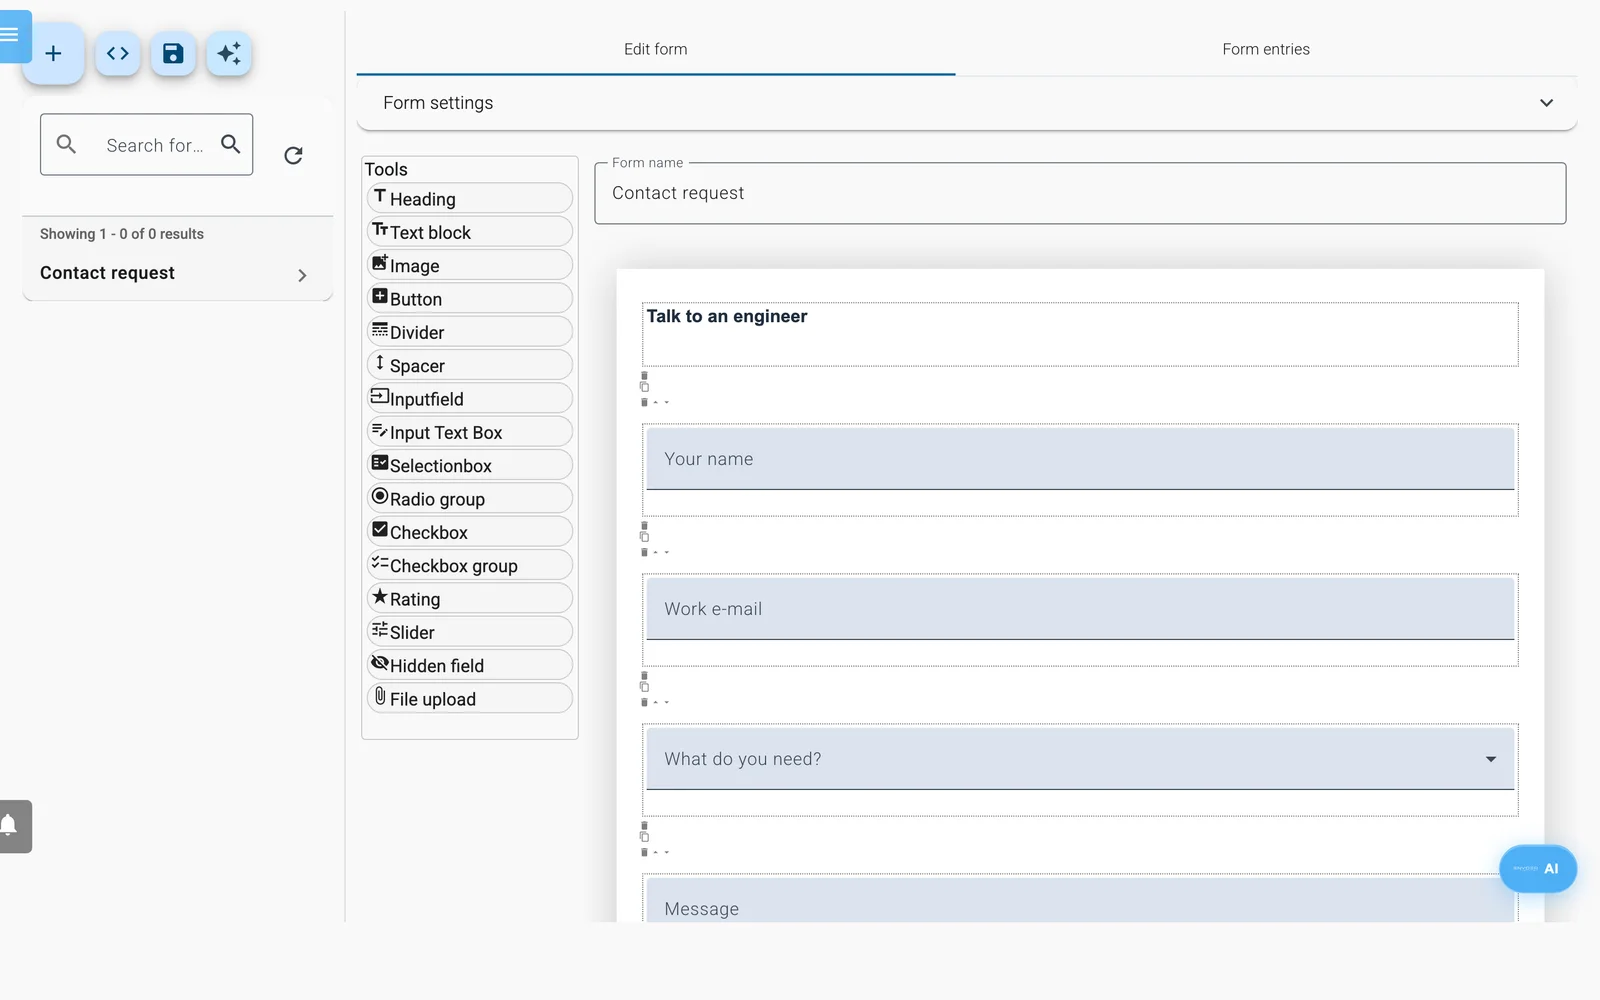
Der Formular-Baukasten: links die Palette Werkzeuge, rechts das Formular.
| Element | Wofür Sie es verwenden |
|---|---|
| Überschrift, Textblock, Bild | Titel, Hilfetext, ein Logo |
| Trennlinie, Abstandshalter | Eine Linie, Leerraum |
| Schaltfläche | Senden des Formulars |
| Eingabefeld | Eine einzeilige Antwort |
| Eingabe-Textfeld | Eine längere Antwort |
| Auswahlbox | Eine Dropdown-Liste |
| Optionsgruppe | Eine Option auswählen |
| Kontrollkästchen, Kontrollkästchengruppe | Ein einzelnes Kästchen zum Abhaken oder mehrere Optionen |
| Bewertung, Schieberegler | Sterne (bis zu 10), ein Wert auf einer Skala |
| Verstecktes Feld | Ein Wert, der mit dem Eintrag gespeichert wird und für Besucher unsichtbar ist |
| Datei-Upload | Besucher eine Datei anhängen lassen |
- Schaltfläche: Eine neue Schaltfläche hat keine Aktion. Wählen Sie sie aus und wählen Sie Formular abschicken als ihre Aktion, sonst lässt sich das Formular nicht senden.
- Eingabefeld: Wählen Sie für jedes Feld einen Typ der Eingabe. Wählen Sie email für die E-Mail-Adresse. Per E-Mail antworten und der Abgleich mit dem CRM sind darauf angewiesen. Aktivieren Sie erforderlich, um ein Feld zum Pflichtfeld zu machen.
- Verstecktes Feld: Auf Ihrer Website lesen die Quellen utm_ und Seiten-URL die Adresse des Formular-Frames, nicht die Ihrer Seite. benutzerdefinierter Wert funktioniert immer, zum Beispiel um die Seite zu kennzeichnen, auf der das Formular steht.
Ein Feld nur anzeigen, wenn ein anderes Feld einen Wert hat
- Klicken Sie auf das Feld.
- Setzen Sie ein Häkchen bei Nur anzeigen, wenn:.
- Wählen Sie unter Dieses Feld: das Feld, das es steuert.
- Geben Sie unter Enthält Wert den Wert ein, der übereinstimmen muss.
Trotz der Bezeichnung ist der Abgleich exakt: Das Feld erscheint nur, wenn das steuernde Feld genau diesen Wert hat. Auf Ihrer Website prüft das Formular die Bedingung nur erneut, wenn sich eine Auswahlbox ändert; verwenden Sie daher eine Auswahlbox als steuerndes Feld.
Datei-Uploads
- Uploads funktionieren im eingebetteten Formular, nicht auf Landingpages. Der Eintrag zeigt die Datei als Link Datei herunterladen.
- Unabhängig davon, was Sie unter Max. Größe (MB) eingeben, akzeptiert Enydea nur Dateien bis 15 MB mit diesen Typen: JPG, JPEG, PNG, GIF, WEBP, PDF, DOC, DOCX, XLS, XLSX, PPT, PPTX, TXT und CSV. Erlaubte Typen kann das weiter einschränken.
- Enydea verwaltet den Dateispeicher. Wenn Besucher „File upload failed“ sehen, wenden Sie sich an den Support.
Den Einbettungscode abrufen
- Wählen Sie das Formular aus.
- Klicken Sie auf Implementierungscode abrufen (das Code-Symbol). Ein Dialog mit dem Titel Code kopieren öffnet sich.
- Klicken Sie auf Code kopieren.
- Fügen Sie den Code in den HTML-Code Ihrer Seite an der Stelle ein, an der das Formular erscheinen soll.
Der Code besteht aus einem Frame, der Ihr Formular aus Enydea lädt, und einem kleinen Skript, das seine Größe anpasst. Spätere Änderungen, die Sie speichern, erscheinen auf Ihrer Website, ohne dass Sie den Code erneut einfügen müssen.
Einträge bearbeiten
Öffnen Sie die Registerkarte Formulareinträge (Form entries). Jede Karte zeigt die ersten ausgefüllten Felder, das Datum und die Quelle des Besuchs.
- Verwenden Sie Alle Felder durchsuchen und den Filter Status (Alle, Neu, Verarbeitet). Filter zurücksetzen setzt beides zurück.
- Klicken Sie auf einen Eintrag, um Details zum Formulareintrag zu öffnen. Enydea füllt die CRM-Felder aus dem Eintrag und schlägt unter Umständen eine passende Beziehung vor (Diese Zuordnung verwenden). Wählen Sie unter Zum CRM hinzufügen eine bestehende Beziehung oder aktivieren Sie Neue Beziehung erstellen, aktivieren Sie optional Als Anruf protokollieren oder Kontaktperson hinzufügen und klicken Sie auf Speichern. Das Speichern markiert den Eintrag als Verarbeitet, auch wenn Sie nichts geändert haben.
- Das Personensymbol (Zum CRM hinzufügen) fügt den Absender hinzu, ohne den Eintrag zu öffnen. Hinzugefügte Einträge zeigen Bereits zum CRM hinzugefügt. Einträge, die die automatische Option hinzugefügt hat, können trotzdem Zum CRM hinzufügen anbieten; ein Klick darauf legt kein Duplikat an.
- Per E-Mail antworten (der Briefumschlag) erscheint nur bei Einträgen, die ein Eingabefeld vom Typ email haben.
Wo Einträge außerdem erscheinen
- Die Glocke (Benachrichtigungen) zeigt den Namen des Formulars, zum Beispiel
New entry on "Contact", und die eingegebenen Werte. Ein Klick darauf öffnet diesen Eintrag aus Formulareinträge. Wenn unter Einstellungen -> Konto -> Benachrichtigungseinstellungen die Option Formular-Benachrichtigungen aktiviert ist, erhalten Sie außerdem eine E-Mail, und ihr Link öffnet denselben Eintrag. - Aktionspunkte (Action Items) -> Formulareinsendungen listet Einträge auf, die auf Sie warten. Den Eintrag selbst öffnen Sie über Formulare.
- Das Dashboard kann ein Widget Formulareinsendungen zeigen (Dashboard-Komponenten hinzufügen -> Formulareinsendungen hinzufügen).
Grenzen
- Auf einer Landingpage lässt das Formular Datei-Upload, Verstecktes Feld und bedingte Felder weg, und Einsendungen automatisch zum CRM hinzufügen gilt dort nicht. Verwenden Sie dort Zum CRM hinzufügen.