
Connecter votre boîte mail
Objectif
Connectez votre propre boîte mail pour lire, envoyer et suivre vos e-mails depuis Enydea. Cela prend environ 10 minutes.
Ce qu’il vous faut
- Les identifiants de la boîte mail à connecter.
- Pour Office 365 : sachez que certains comptes d’entreprise exigent d’abord l’approbation d’Enydea par un administrateur Microsoft 365.
- Pour Gmail et la plupart des autres fournisseurs : un mot de passe d’application si le compte utilise l’authentification à deux facteurs. Créez-le dans les paramètres de sécurité du compte chez votre fournisseur.
Étapes
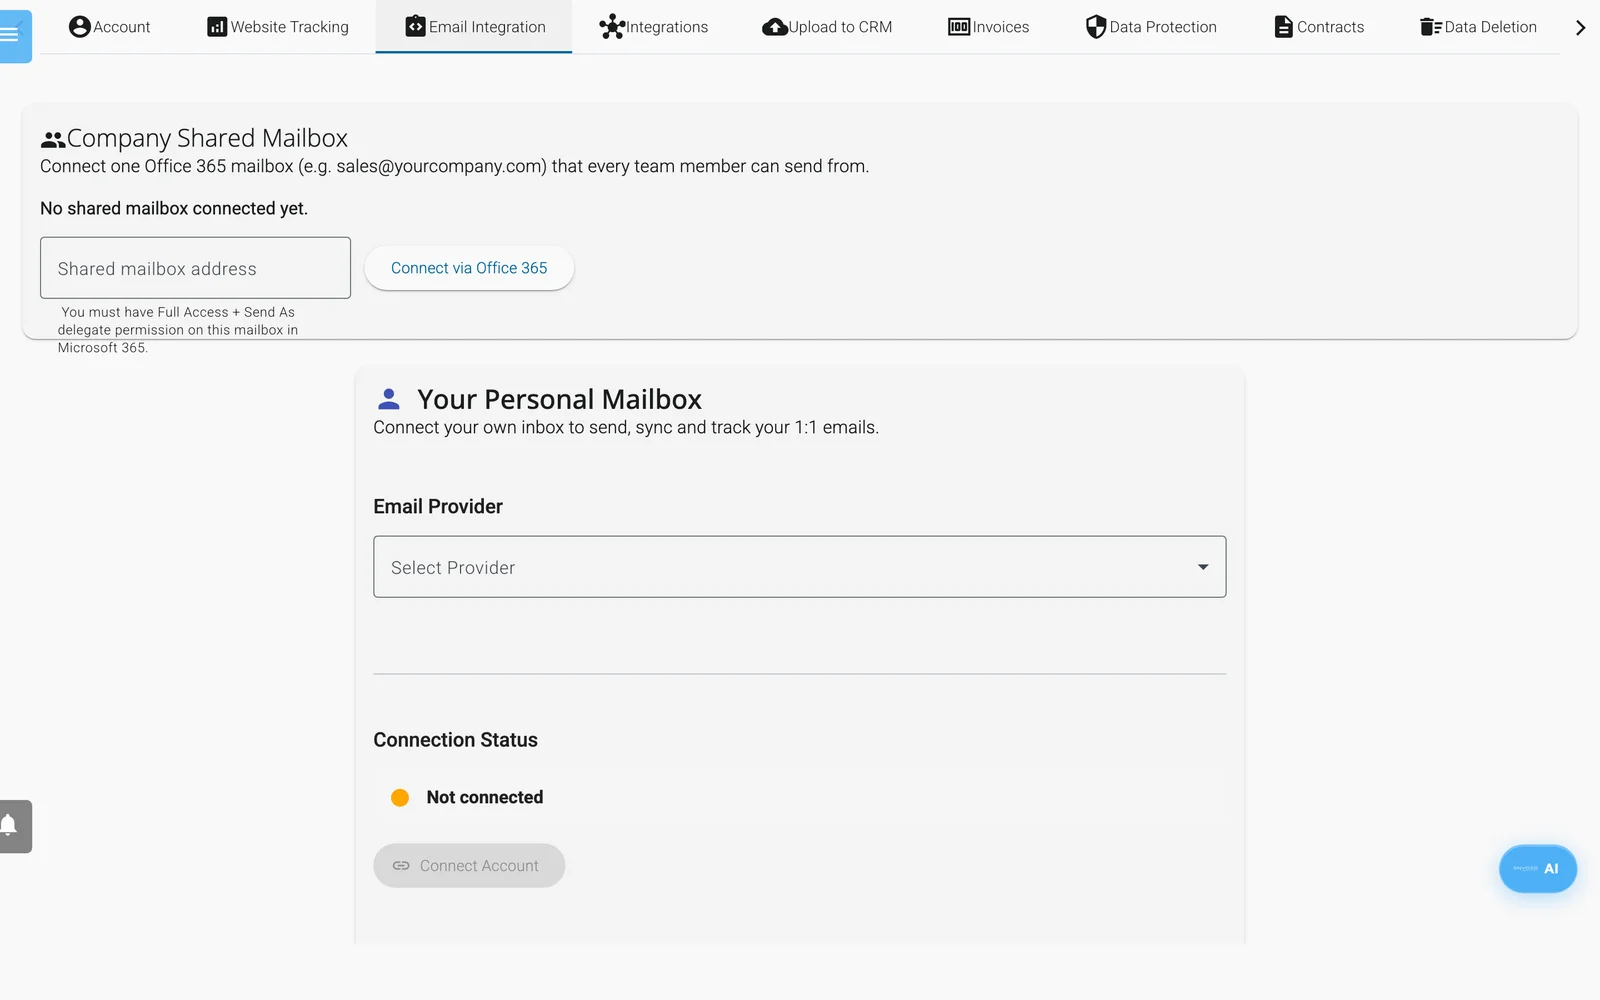
Paramètres, Intégration e-mail.
- Cliquez sur l’icône d’engrenage en bas de la barre latérale pour ouvrir Paramètres (Settings), puis ouvrez l’onglet Intégration e-mail (Email Integration).
- Dans Votre boîte mail personnelle, ouvrez Sélectionner un fournisseur et choisissez :
- Microsoft Office 365
- IMAP / SMTP (autre fournisseur) pour Gmail, Google Workspace, Outlook.com, Yahoo, Fastmail, Zoho et d’autres
- Google Gmail figure aussi dans la liste. Pour les comptes Google, utilisez plutôt IMAP / SMTP avec le préréglage Gmail.
- Pour Office 365, cliquez sur Connecter un compte. Votre navigateur passe à la page de connexion Microsoft dans la même fenêtre. Connectez-vous, donnez votre accord, et vous revenez dans Paramètres.
- Si Microsoft demande l’approbation d’un administrateur, cliquez plutôt sur Connexion temporaire (sans approbation de l'administrateur). Cette connexion dure environ une heure. Vous devez vous reconnecter tant que votre administrateur Microsoft 365 n’a pas approuvé l’application.
- Pour IMAP / SMTP, cliquez sur un bouton Remplissage rapide, par exemple Gmail / Google Workspace (mot de passe d'application). Les préréglages sont Gmail / Google Workspace, Outlook.com / Microsoft 365, Yahoo Mail, Fastmail et Zoho Mail. Ils remplissent Serveur IMAP, Port et les informations SMTP.
- Saisissez votre Nom d'utilisateur et votre Mot de passe (un mot de passe d’application si votre fournisseur l’exige). Cliquez sur Connecter un compte.
- Enydea vérifie la réception et l’envoi. Si le mot de passe est incorrect ou si l’envoi échoue, une erreur explique ce qu’il faut corriger et le formulaire reste ouvert. Corrigez-le et cliquez à nouveau sur Connecter un compte.
Astuce : Pour modifier ultérieurement une boîte mail IMAP, cliquez sur Modifier les paramètres. Le mot de passe n’est pas affiché : saisissez-le à nouveau pour enregistrer.
Tester et régler la connexion
- Sous État de la connexion, vérifiez que la mention Connecté s’affiche, puis cliquez sur Tester la connexion. Un message confirme « Test de connexion réussi ! » ou indique que le test a échoué.
- Sous Paramètres de synchronisation, laissez Activer la synchronisation automatique des e-mails activé et choisissez Fréquence de synchronisation : 5, 10, 15 ou 30 minutes, ou 1 heure. Synchroniser maintenant synchronise immédiatement.
- Sous Paramètres de l'expéditeur, renseignez Nom d'expéditeur / nom affiché, Adresse de réponse (Reply-To), Cc par défaut, Cci par défaut et Pied de page / clause de non-responsabilité de l'e-mail, puis cliquez sur Enregistrer les paramètres d'expéditeur. Office 365 peut ignorer le nom d’affichage, selon la politique de votre entreprise.
- Faites défiler jusqu’à Signatures e-mail et cliquez sur Ajouter une signature. Saisissez un Nom de la signature, choisissez Quand utiliser cette signature (Toujours, Plage de dates ou Rotative), rédigez le contenu et cliquez sur Créer. La signature est ajoutée aux nouveaux messages, et vous pouvez la désactiver dans la fenêtre de rédaction.
Facultatif : connecter une boîte mail d’équipe partagée
Seul un administrateur de l’entreprise peut le faire, et uniquement pour Office 365.
- En haut de Intégration e-mail, repérez Boîte mail partagée de l'entreprise.
- Saisissez l’Adresse de la boîte mail partagée. Il vous faut les autorisations Full Access et Send As sur cette boîte aux lettres dans Microsoft 365.
- Cliquez sur Connecter via Office 365 et connectez-vous.
- Pour en faire la boîte par défaut de l’équipe, activez Utiliser comme boîte mail par défaut pour toute l'équipe. Chacun peut toujours passer à sa propre boîte mail dans la Boîte mail.
Vérifier le résultat
Ouvrez Boîte mail (Mailbox) dans le menu de gauche. Le haut de l’écran doit afficher Connecté avec votre adresse. Rédigez un message à votre propre adresse et vérifiez qu’il arrive.
Si la connexion cesse de fonctionner
Une connexion peut cesser de fonctionner, par exemple lorsque votre fournisseur met fin à la session. Vous voyez alors Non connecté dans la Boîte mail, un message proposant Reconnecter lorsque vous envoyez un e-mail, ou « Cette connexion doit être rétablie » sur la carte de la boîte mail partagée. Retournez dans Paramètres -> Intégration e-mail et cliquez à nouveau sur Connecter un compte (ou Reconnecter). Une connexion Office 365 temporaire se termine toujours au bout d’environ une heure.
Pour aller plus loin
- Découvrez l’écran : Boîte mail.
- Envoyez des e-mails en masse : Configurer un domaine d’envoi d’e-mails en masse.
- Laissez vos clients réserver des rendez-vous : Prise de rendez-vous et liens de réservation.